[CentOS8] nginx 웹서버(1) - 구축, php설정
1. nginx 설치
epel-release 인스톨 및 yum 저장소를 업데이트 해줍니다.
[root@master ~]# yum install -y epel-release
[root@master ~]# rpm -ivh http://rpms.remirepo.net/enterprise/remi-release8-.rpm
[root@master ~]# yum –enablerepo=remi update remi-release
[root@master ~]# yum -y install nginx
[root@master ~]# systemctl start nginx
[root@master ~]# nginx -v
nginx version: nginx/1.14.1
1.14버전이 설치 되었다.
/etc/nginx/nginx.conf --> 주환경설정 파일
/etc/nginx/conf.d/*.conf --> 보조환경설정 파일(파일이름 상관없이 *.conf 형식으로 만들면 된다)
/usr/share/nginx/html/ --> 기본문서 디렉터리 경로
/var/log/nginx --> 로그파일 저장 경로
2. 방화벽 설정
[root@master ~]# firewall-cmd --permanent --zone=public --add-service=http
[root@master ~]# firewall-cmd --permanent --zone=public --add-service=https
[root@master ~]# firewall-cmd --reload
* iptables 는 포트 80번(http),443번(https) 열어주면됨.
그럼 nginx 웹서버 구축은 끝났다!
vi /usr/share/nginx/html/index.html 에 기본 설정으로 인해 웹서버의 ip를 입력하면 아래의 기본 웹페이지가 뜬다!

3. PHP 연동
apache 웹서버는 php를 따로 설치할 필요가 없었는데, nginx 서버는 php를 사용하려면 따로 설치를 해야한다
PHP란?PHP(PHP: Hypertext Preprocessor)는 C언어를 기반으로 만들어진 서버 측에서 실행되는 서버 사이드 스크립트 언어이다.
PHP는 동적 웹 페이지를 쉽고 빠르게 만들 수 있도록 해주는 데 그 목적이 있다.
PHP로 작성된 코드를 HTML 코드 안에 추가하면, 웹 서버는 해당 PHP 코드를 해석하여 동적 웹 페이지를 생성한다.
[root@master ~]# yum -y install php php-fpm
[root@master ~]# vi /etc/php-fpm.d/www.conf
user=nginx  # apache를 nginx로 바꾼거임
group=nginx
listen.owner = nginx  # 주석제거하고 nginx로 바꾼거임
listen.group = nginx
[root@master ~]# systemctl start php-fpm
[root@master ~]# php -v
PHP 7.2.24 (cli) (built: Oct 22 2019 08:28:36) ( NTS )
Copyright (c) 1997-2018 The PHP Group
Zend Engine v3.2.0, Copyright (c) 1998-2018 Zend Technologies
[root@master ~]# vi /etc/php-fpm.d/www.conf
listen = /run/php-fpm/www.sock
위의 파일에서 listen 파일 경로를 확인해야 한다
nginx.conf 파일의 fastcgi_pass 경로에 넣어야하기 때문이다
본인은 7.2.24. 버전이기 때문에 위의 소켓 경로가 잘 설정되어 있었다
[root@master ~]# vi /etc/nginx/nginx.conf
server {
listen 80 default_server;
listen [::]:80 default_server;
server_name www.chul.com; # 사용ip or 도메인
root /usr/share/nginx/html;
# Load configuration files for the default server block.
include /etc/nginx/default.d/*.conf;
location / {
}
location ~ \.php$ {
fastcgi_pass unix:/run/php-fpm/www.sock; # php-fpm의 listen과 같은 주소여야함
fastcgi_index index.php;
fastcgi_param SCRIPT_FILENAME $document_root$fastcgi_script_name;
include fastcgi_params;
}
위의 빨간색 글씨 항목을 server {} 에 넣어주면 된다.
[root@master ~]# systemctl restart php-fpm
설정파일을 수정했으니 재시작
[root@master ~]# vi /usr/share/nginx/html/index.php
<?php phpinfo(); ?> 를 넣고 테스트 해봅시다
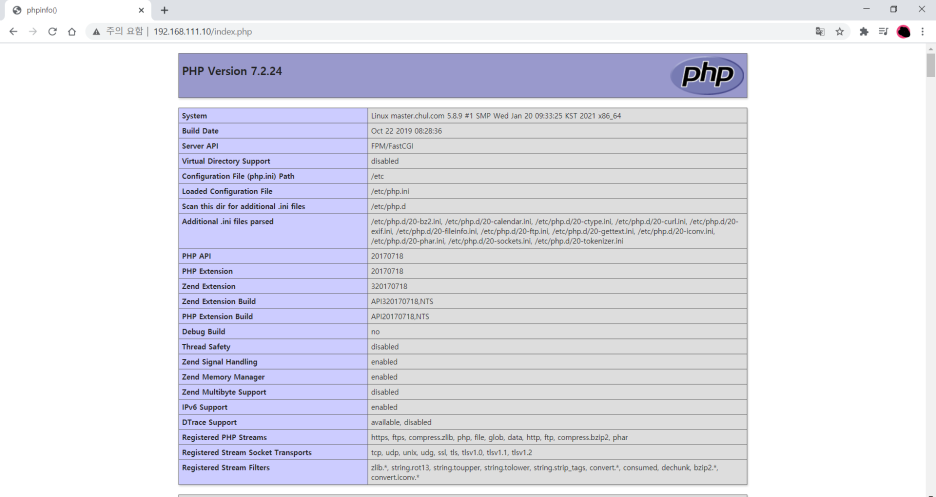
완료~~